среда, 24 мая 2017 г.

A Craigslist Furniture Bedroom Makeover


I could never possibly "finish" decorating a room because for me, decorating is an ongoing process and an expression of how I feel at any give time. So nothing is ever "done" it's just in transition! And my guest bedroom is no exception, as it recently got a little makeover.
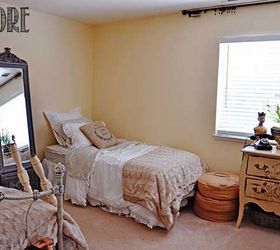
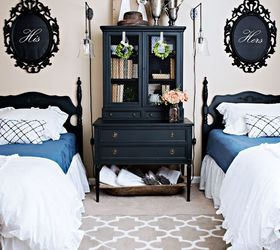
My guest room is often used by the grandparents or by the kids when they have a friend sleeping over and with very tight quarters, twin beds just made more sense for us. The room is visible from the main part of our house and so I wanted it to look nice, but it rarely gets used so I didn't want to spend a lot money on furnishing and decor. I was able to use mismatched Craigslist furniture {painted black} with accessories and bedding from Target, IKEA, and HomeGoods to get the look I wanted at a price I could afford. You can find a full list of sources, including what paint was used in THIS POST, but below is a photo of how the room looked a couple of weeks ago
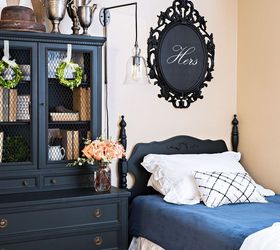
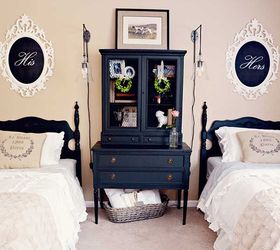
For the second part of the room's makeover, all I did was add some blue blankets and turn the bedding down so that the blankets were exposed. I also added a rug and painted the IKEA frames above the bed black (instead of white). It's amazing what a dramatic impact these small changes had on the room!
You can find more photos and details by clicking on the blog post link provided. :)


Craigslist furniture painted black and paired with pops of blue and white for a dramatic and cozy space!


a craigslist furniture bedroom makeover, bedroom ideas, home decor


The BEFORE. My guest room was basically a storage area with no personality.


a craigslist furniture bedroom makeover, bedroom ideas, home decor


This is the guest room after Part 1 of it's makeover, with its Criagslist furniture painted black.


a craigslist furniture bedroom makeover, bedroom ideas, home decor


Here's the room today! Just a few small tweaks and the room looks dramatically different!


a craigslist furniture bedroom makeover, bedroom ideas, home decor


The inside of the cabinet holds a combination of decorative and useful items. You can see my tips for decorating shelves by clicking HERE


a craigslist furniture bedroom makeover, bedroom ideas, home decor


I added pencils and paper for guests inside the cabinet.


a craigslist furniture bedroom makeover, bedroom ideas, home decor


The top of the cabinet slides forward to become a small writing desk.


a craigslist furniture bedroom makeover, bedroom ideas, home decor


I framed the wi-fi password, as that is a common question from guests! You can download this printable for FREE at the link below so that you can print and frame your own password sign!
To see more photos and get source details, click on the link below.


a craigslist furniture bedroom makeover, bedroom ideas, home decor


Original article and pictures take http://www.hometalk.com/14529875/a-craigslist-furniture-bedroom-makeover site


Industrial Whimsy Equals Spring Rustic Wreath


When I saw this old rusty thing in the antique store, I just knew it would make a cute wreath (and a great project for the blog hop), and with a little help from Mom (she's the most awesome bow maker I know) and a few adders from Michaels (all on sale), we came up with this super cute Easter wreath that brings a bit of whimsy to this industrial find.
This rusty old thing once housed a medium-gauge wire, known only because there was still a bit left behind, and I decided to leave the wire on the spool for authenticity's sake. A not-so-quick trip to Michael's supplied all the other goodies for this wreath, including some grapevine wrapped carrots, cute orange ribbon, a metal painted bunny and a magnetic wooden initial letter. Now let me tell you, picking out all my goodies for this project was by far the most time-consuming and difficult task of this whole thing. Once I got all the parts and pieces home, Mom and I put everything together with a bit of floral wire and a dab of hot glue, and that was all it took.
I picked the orange ribbon because the carrots weren't orange and that just didn't seem right. The bow also adds some much-needed color to the project and who doesn't just love polka dots. The magnetic initial letter was a bonus since it stuck right to the metal rabbit I found. Of course, it's our family initial, but I'm thinking some folks might think it stands for "spring," and I'm okay with that. Although you can't see much of the carrots, I really like those rustic veggies and think the grapevine kind of mimics the wire on the spool. I gotta say I'm pretty in love with the way this little rustic wreath turned out.
I hope you enjoyed my little stop on the DIY My Spring! blog hop sponsored by Hometalk. You can find other great spring ideas at


I bought this spool at an antique store for $8.00. . . not the best bargain, but it turned into a great find!


industrial whimsy equals spring rustic wreath, crafts, seasonal holiday decor, wreaths


With a few items from the local craft store (all on sale), the rusty spool became a whimsy wreath.


industrial whimsy equals spring rustic wreath, crafts, seasonal holiday decor, wreaths


Another view of the finished product hanging on my mom's door. Is the "S" our last name or does it stand for "Spring?"


industrial whimsy equals spring rustic wreath, crafts, seasonal holiday decor, wreaths


A close up of the spool adorned with grapevine carrots, orange ribbon, a metal rabbit and magnetic initial letter.


industrial whimsy equals spring rustic wreath, crafts, seasonal holiday decor, wreaths


Original article and pictures take http://www.hometalk.com/14526164/industrial-whimsy-equals-spring-rustic-wreath site


Handcrafted Forever Spring Crocuses - DIY


A sure sign of the arrival of spring is seeing the crocuses - poking their way up through dead fallen leaves, faded mulch or even late fallen snow. And, I love seeing the low growing , purplish cup shaped flowers suddenly appear after what seems like a long winters night but unfortunately their blooms don't last long.
So I'm joining a wonderful group of creative Hometalk bloggers to and, as my project, make handcrafted forever crocuses out of foam sheets in a natural setting of moss and mulch.


The crocuses are quite easy to make - besides the foam sheets, you will also need a simple petal pattern, floral stem wire, faux stamen, paint, electric griddle or iron to shape the petals, scissors, and a few other household items.
Begin by cutting out a petal pattern that's been placed on foam sheets and cut out the petals. Six petals are needed per flower.


handcrafted forever spring crocuses diy, crafts, diy, seasonal holiday decor


Use chalk pastels or paint to add highlights and dimension to the petals . . .


handcrafted forever spring crocuses diy, crafts, diy, seasonal holiday decor


and then place the petals on a hot smooth griddle or iron for 6-7 seconds to curve the petals and give shape.


handcrafted forever spring crocuses diy, crafts, diy, seasonal holiday decor


To assemble the flower, hot glue the faux stamens to the tip of the wire stems . . .


handcrafted forever spring crocuses diy, crafts, diy, seasonal holiday decor


and then start gluing on the six petals, one at a time, around the stem and stamen.


handcrafted forever spring crocuses diy, crafts, diy, seasonal holiday decor


handcrafted forever spring crocuses diy, crafts, diy, seasonal holiday decor


handcrafted forever spring crocuses diy, crafts, diy, seasonal holiday decor


Insert the wire stem of the flower into a hollow cookie stick, paint green and glue together to mimic the wider stems of crocuses. Cut leaves from green foam and hot glue them to the stems.


handcrafted forever spring crocuses diy, crafts, diy, seasonal holiday decor


To display the crocuses, glue pieces of floral foam to cardboard and . . .


handcrafted forever spring crocuses diy, crafts, diy, seasonal holiday decor


and cover with dried moss and mulch.


handcrafted forever spring crocuses diy, crafts, diy, seasonal holiday decor


Have fun inserting crocuses in the moss and mulch for an awesome spring display!


handcrafted forever spring crocuses diy, crafts, diy, seasonal holiday decor


handcrafted forever spring crocuses diy, crafts, diy, seasonal holiday decor


handcrafted forever spring crocuses diy, crafts, diy, seasonal holiday decor


Original article and pictures take http://www.hometalk.com/14525786/handcrafted-forever-spring-crocuses-diy site


Cabbage Centerpiece


I Made Cabbage from Toilet Paper.
That's right... a great centerpiece can start with toilet paper!


If you want to try this, you'll need to go to the restroom and grab a roll.


cabbage centerpiece, container gardening, crafts, flowers, how to


Then go into the kitchen and the garage for some more ingredients. It's for toilet paper clay.
Materials
Toilet paper (about half of 1 roll)
1 cup joint compound (in the paint aisle)
6 ounces white glue
3/4 cup flour
Water
I filled a large bowl with toilet paper and added water to it. And kept adding the toilet paper until I had about 2 cups of wet paper.
Then squeezed out as much water as possible and tore it up into pieces.


cabbage centerpiece, container gardening, crafts, flowers, how to


What is nice about this being better than paper mache is, it's smoother. AND it's a great blank canvas to make whatever you want with it.


cabbage centerpiece, container gardening, crafts, flowers, how to


Like cabbages!
Using a large freezer bag, I added the wet toilet paper, joint compound, glue and flour and mixed it together. (Just kept squeezing the bag.)
It formed a nice soft clay.
Then I took a bowl the size of a cabbage and placed plastic wrap all around it.
Taking handfuls of the clay, I placed it onto the plastic wrapped bowl to press a large cabbage leaf into it to make impressions all around the bowl.
I allowed the clay to form at the rim of the bowl to make the leaves appear as part of the cabbage wilting.
Then set the bowl in an airy place for a couple of days to dry thoroughly.


cabbage centerpiece, container gardening, crafts, flowers, how to


Once it dried, I painted it with green watercolors to make it more realistic.
After painting the cabbage bowl, I used polycrylic to clear coat and seal it.
Then the fun part... making the spring arrangement. I cut artificial peonies to fit into a floral foam inside the cabbage bowl.
And finally... a farm style floral centerpiece is created.
Hopefully that helped! If not see the full detailed post at http://redoityourselfinspirations.blogspot.com/2016/03/cabbage-centerpiece.html


cabbage centerpiece, container gardening, crafts, flowers, how to


After making the cabbage bowl, drying it, and painting it... the fun part was the springtime arrangement.


cabbage centerpiece, container gardening, crafts, flowers, how to


I added artificial peonies. Now, this cabbage arrangement is preserved!
I'm also excited to be part of Hometalk's DIY My Spring! Home and Garden Blog Hop today. Be sure to see other Spring ideas for your home and garden.
MySpring


cabbage centerpiece, container gardening, crafts, flowers, how to


Original article and pictures take http://www.hometalk.com/14520939/cabbage-centerpiece site


#DIYMySpring Decor: Modern Macrame Plant Hanger


I was perusing a thrift store recently looking for an interesting vase when I came across a modern shape that filled me with inspiration. It was a FISH BOWL! I picked it up for $2.50 and knew exactly what I would do.

With spring approaching, I wanted to bring some greenery into my home. I don't often keep live plants because I'm not very responsible about watering them. However, my sister convinced me to try a spider plant because they are apparently very forgiving with light/water conditions. She shared her spider plant with me and helped me pot it in my fish bowl.


My vision for this fish bowl plant included hanging it in my living room. I wanted to make my own modern macrame plant hanger, something simple that wouldn't detract from the glass bowl. Some macrame is so chunky. I found a GREAT tutorial for creating a DIY macrame holder from the blog lovegrowswild.com.
Since this tutorial was so great, I easily tied together 8 strands of white string into a modern macrame plant holder in less than an hour!


diymyspring decor modern macrame plant hanger, gardening, home decor, wall decor


If you want to see exactly how to make one, please visit Liz's blog and read her excellent tutorial. There's no need for me to reiterate the same information here. The only supplies were about 50 ft of white string (I had a huge roll laying around my house), a scissors, and a swag hook to hang it from the ceiling.


diymyspring decor modern macrame plant hanger, gardening, home decor, wall decor


I basically tied the string like a fish net, which was fitting to hang a fish bowl.


diymyspring decor modern macrame plant hanger, gardening, home decor, wall decor


From the bottom you can see the knot my macrame holder started with and then the sections of string I tied like a net.


diymyspring decor modern macrame plant hanger, gardening, home decor, wall decor


Then I screwed the swag hook into the ceiling wood stud and tied it up!


diymyspring decor modern macrame plant hanger, gardening, home decor, wall decor


I chose to hang this spider plant in the corner of my living room where it will get a lot of light and is always difficult for me to decorate. It really only looks good with a Christmas tree sitting there. This plant is perfect for the space and brings me so much joy!


diymyspring decor modern macrame plant hanger, gardening, home decor, wall decor


I hope this spider plant is happy living here!


diymyspring decor modern macrame plant hanger, gardening, home decor, wall decor


If you enjoyed this post, please leave me a comment and share! Tell me, have you ever tried macrame? How do you display greenery in your home?


diymyspring decor modern macrame plant hanger, gardening, home decor, wall decor


Head on over to my blog to see the whole blog hop list and more creative spring decor ideas from my own crafty little head. For instance, check out my spring decor from last year where I posted a tutorial on how to make this faux eggs & nest display.


diymyspring decor modern macrame plant hanger, gardening, home decor, wall decor


Thank you for reading, you're the best!


diymyspring decor modern macrame plant hanger, gardening, home decor, wall decor


Original article and pictures take http://www.hometalk.com/14519807/diymyspring-decor-modern-macrame-plant-hanger site


Spring Ombre Flower Mirror


Spring is my favorite season! I wanted some new, bright wall decor this year so I decided to add a fresh spin to the old (but loved) spoon mirrors. I'm excited to be joining some other amazing hometalk bloggers in a blog hop with our favorite spring projects


With just some plastic spoons, multi surface paint, cardboard and a mirror you can make a beautiful wall decor for less than $25!


spring ombre flower mirror, crafts, repurposing upcycling, wall decor


First step is the spoons. I wanted a different look than the usual spoon mirrors. I wanted the spoons to look like petals. Using a candle, hold the spoon just over the flame until it's soft. Don't melt the plastic (work in a well ventilated room, but the fumes won't be bad if you're just softening it).
after the spoons are bent, then it's time to paint them. I used Americana Multi Surface Satin paint in varying turquoise colors (affiliate link)


spring ombre flower mirror, crafts, repurposing upcycling, wall decor


Then glue the petals to your cardboard circle.


spring ombre flower mirror, crafts, repurposing upcycling, wall decor


Once all your petals are on, glue the mirror into the center and you're ready to hang on the wall!
I used a 12 inch mirror, so my cardboard circle was a little more than double that size at 26 inches wide.


spring ombre flower mirror, crafts, repurposing upcycling, wall decor


To see more details, like the exact paint colors I used, a video, and all of the other amazing spring projects by other hometalk bloggers visit the blog link below!


spring ombre flower mirror, crafts, repurposing upcycling, wall decor


Original article and pictures take http://www.hometalk.com/14519325/spring-ombre-flower-mirror site


Succulent Decor! We Are Ready for Spring!


These eye catching planters are so simple to make with shoes from the thrift store! Super easy project!


Grab some old shoes, some succulents, and you are half way there!


succulent decor we are ready for spring, container gardening, flowers, gardening, repurposing upcycling, succulents, Use colorful shoes of all sizes


This was such a fun fun project! I have listed on the blog where to buy succulents online since many readers had questions as to where to buy them! There are many different kinds of succulents available. And the best part...they multiply quickly!
Hop over to the blog for more info! www.shopatblu.com


succulent decor we are ready for spring, container gardening, flowers, gardening, repurposing upcycling, succulents, We plant succulents in ANY type of containers


So many possibilities with the fantastic project! You can scatter these anywhere...but the front door, back door, pool area, patio, by the mailbox, under a window!


succulent decor we are ready for spring, container gardening, flowers, gardening, repurposing upcycling, succulents, Check out how easy this is


Original article and pictures take http://www.hometalk.com/14518372/succulent-decor-we-are-ready-for-spring site