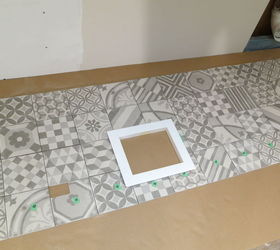
Encaustic cement tiles are a hot look right now. We used a porcelain look-a-like that was budget friendly and easy to work with (they came with 'bump outs' on the side so we didn't even have to use tile spacers!)
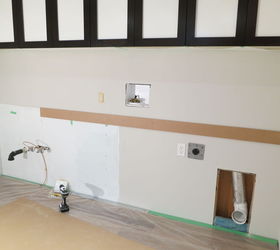
We're in the process of renovating our laundry room in the basement. The tutorial walks you through applying a backsplash that is enclosed by two side walls.
Below is a brief 10-step description of the process. Be sure to check out my blog at Birdz of a Feather (see link below) for the full details .
1. Gather your tools. Here's a list of what we used, in no particular order:
a. Sponge or rag
b. Trowel (we used " x " notched trowel, but ask your tile store what they recommend for your particular tiles)
c. Towel and/or paper towels (to dry cut tiles and wipe up thinset)
d. Plastic, cardboard, newspaper and waterproof paper to protect floors and walls, and work surface.
e. Mask, goggles
f. Sharpened pencils
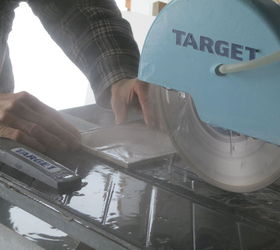
g. Wet saw or snap tile cutter
h. Green painters tape
i. Water and bucket to mix thinset
j. Extra bucket of water for washing up tools and rinsing your hands in
k. Level
l. Combination square for connecting marks on tile to cut for obstructions like wall outlets.
m. Marker - we used this to write number on the green tape and transfer them to the tiles so we wouldn't get the order or direction of each tile mixed up
n. Layout guide - if you draw one up on computer or by hand
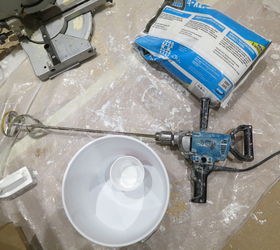
o. Thinset
p. Tile
q. Workspace. It's essential to have something to work on that's not on the floor. We set up two saw horses and laid an old flush door across them for our flat surface. Because it was all beat up, we didn't protect the surface, but you might want to put down some newspaper or plastic.
r. Two plastic 'measuring cups' - (one for water and one for thinset). Something like a margarine or yoghurt container is ideal for measuring out the water and thinset, but make sure they're the same size to keep the proportions consistent.
s. Paint stick for initially mixing thinset
t. Drill
u. Cement mixer attachment for drill


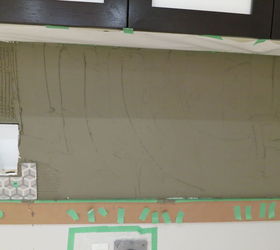
Warning: draw a faint line the width of your tiles against the side walls FIRST before placing your tape and paper. If you leave anything within the space that the grout will be going, the tape and paper will get permanently stuck on by the grout you'll have bits and pieces that you won't be able to pull away when you're done grouting (same goes for underneath the cabinet). If that happens, you'll need to carefully cut these away from the wall with an exacto knife and it will be a pain!

First, determine the height for the ledger board. Learn from our trials and tribulations! Did you know that flat pack cabinets drop down lower than the rest of the box where the sides meet? Be sure to measure down from the lowest point of the cabinet when you place your ledger!

Pencil on a horizontal line for the ledger and also a vertical line at the centre of the wall to divide your work area into two manageable sections.
Measuring with a tape measure can be tricky. To find the centre to place your vertical line, measure the entire wall, then divide the total measurement in half. Measure in from the side of both ends of the wall and place a mark each time. If you end up with a gap between these two measurements, split that gap in half and you will have the exact centre of your wall!
Pre-drill the ledger board, then screw it into place.
At this point, you've probably been at it for several hours. Don't forget to stop and eat to keep your energy up for the rest of the day!


Original article and pictures take http://www.hometalk.com/14526153/the-ultimate-guide-to-installing-a-porcelain-tile-backsplash site
Комментариев нет:
Отправить комментарий