среда, 24 мая 2017 г.

DIY Easter Place Settings


Here is how I made these adorable Easter Utensil Holders from Burlap to add extra color and décor to our dinner table. These Easter Place Setting cutlery holders are easy and inexpensive to make and I think they are just so adorable!


Gather your supplies (full list on original post). Then begin by cutting the burlap into pieces about 5” wide and 15” long. Cut enough pieces to create as many utensil holders as you need.


diy easter place settings, crafts, easter decorations, seasonal holiday decor


Measure and cut pieces of ribbon approximately 1” narrower than your burlap strips.
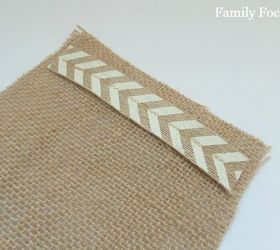
Use your sewing machine to attach the ribbon to one end of the burlap strip. The ribbon should be 1/2” in from the edges of the burlap on 3 sides. Attach it by sewing through the center of the ribbon. I used a small zigzag stitch to make it look a little prettier.


diy easter place settings, crafts, easter decorations, seasonal holiday decor


When your ribbon is attached fold that end of the burlap up to create what will become the utensil pocket. The fold should be at about 1/3 of the piece. It will vary based on your utensils. When the burlap is folded into place you’ll add a stitch around the sides and top of the holder. The stitch should be about 1/2” in from the edges.


diy easter place settings, crafts, easter decorations, seasonal holiday decor


After the utensil holder has been sewn pull out all loose strands of burlap to fray the edges. Be sure to fray along the ribbon as well.


diy easter place settings, crafts, easter decorations, seasonal holiday decor


Next you’ll use a small amount of paint to add the bunny to the front of the utensil holder. First add two angled lines for ears, followed by a small circle for the head, and then a larger circle for the body. After the paint has dried you’ll add a small white circle of paint to create the bunny tail. Using your same paint brush dab a small amount of paint to the frayed edges of the holder. This adds a nice extra pop of color! Make sure to do the painting over a scrap paper or on a covered work surface. Let the paint dry completely. All done!
You can see the full supply list and ideas for variations at Family Focus Blog.


diy easter place settings, crafts, easter decorations, seasonal holiday decor


Original article and pictures take http://www.hometalk.com/14347754/diy-easter-place-settings site


Комментариев нет:

Отправить комментарий